So many cute animals in one box...:)!!! I have always wanted to make many different characters in one bento box, but I never really did more than 3 or 4 (except once, when I made 5 different characters to celebrate my 100th bento) because it would require A LOT of time. This time, however, I didn't spend so much time making this bento, even though there are 10 characters in the box (I actually even made 16, but the box is not big enough for all of them ;)). The reason is because making (simple) characters out of cheese is much easier than making characters out of rice - note: the frogs are made out of cucumber and the pig out of deli meat, but you can work with cucumber and deli meat pretty much like with cheese.


I will do a tutorial on how to make these little creatures in a few weeks' time when I have more time. You will be amazed how easy it is to make them...!

Each of the mini onigiri is filled with chopped umeboshi (pickled plum). The slim bento box contains one ebi fry, two wieners, half a boiled egg, four cocktail shrimps, three blanched carrot flowers, two cherry tomatoes and a slice of tamagoyaki.


Bookmark and Share


I have been feeling quite under the weather for a few days. I almost decided to skip bentoing this weekend and thought that I should just lie in bed the whole day and have some rest. But in the end my urge to prepare a cute bento meal won ;).

This time I made Mameshiba and Panda faces which are made out of goat cheese. Use a round cookie cutter to make the round faces, nori for facial details, chili sauce for the red cheeks and edamame for Mameshiba's ears.

The side dishes include pan-fried gyoza, pan-fried meat patties, cherry tomatoes, edamame, cocktail shrimps and mandarin and grapes for dessert.

As you can see in the photo above, there is also a matching panda fork that comes with this bento. I got this fork from Bento USA. I love the fact that the fork also comes with a matching panda case, which I find very practical - no need to wrap my fork with napkin anymore...!


This panda fork is currently on sale and costs US$5.99. If you are a panda lover, you should have this fork in your collection :)!


Bookmark and Share


This is another Chinese New Year themed bento which is easier to make than my previous 'Year of the Dragon' bento. One reason is because I cheated and took the dragon's head and tail from yesterday's bento which I put aside just for this purpose ;).

This time the dragon's body is a dragon roll sushi (or caterpillar sushi) which I filled with pork schnitzel, cucumber, crab stick and mayo and topped with avocado slices. The dragon is carrying plenty of peaches on his back, which for the Chinese symbolises longevity. The peaches are actually beet juice tinted quail eggs and the leaves are made out of corn salad. The little boy and girl are also made out of quail eggs topped with mini mozzarella cheese for the heads. The hands show typical Chinese gesture for saying 'Gong Xi Fa cai' or Happy New Year.


Bookmark and Share


Hello again, everyone :)! I had been wanting to make a dragon-themed bento to celebrate the Chinese New Year and today I managed to overcome my laziness and made one :). Chinese New Year was always quite important to me when I was a little girl because it was the time when I would get 'red envelopes' filled with 'lucky money', so I always enjoyed visiting my relatives and parents' friends to get those red envelopes, haha ;). But now that I am married, I think that I am no longer eligible to receive those envelopes and I believe it's now my turn to give out red envelopes instead. But since I live in Germany, I don't have anyone to give out red envelopes to - maybe this is a good thing...;)??


I have to admit the dragon was quite complicated to make, but it's worth it because I am so proud that in the end it really does look like a (Chinese-style) dragon ;)!! The body of the dragon is made out of cheese, carrot and nori and the head of the dragon is made out of cheese, crab stick, carrot, nori and soy paper.

The pink, round balls above the dragon are meant to be red lanterns - they are made out of boiled quail eggs which I coloured with beet juice.

The big sakura bento box contains tamagoyaki (omelet with slices of fish cakes and chopped onion), Peking pork chops, garlic & chili shrimps, kimchi mandu and ebi fry.

The round, pink thingy next to the bento boxes is red bean mochi which I bought from my local Asian store.

Peking Pork Chops
Adapted from Rasa Malaysia

Marinade
  • 500 grams pork tenderloin, cut into bite sized pieces
  • 1 egg
  • 1 tablespoon cornstarch
  • 1/2 teaspoon Shaoxing wine
  • 1/2 teaspoon salt
Sauce
  • 1 1/2 tablespoons tomato ketchup
  • 1/2 tablespoon plum sauce
  • 1/2 tablespoon chili sauce
  • 1/4 teaspoon sweet bean sauce, or Hoisin sauce
  • 1 tablespoon Worcestershire sauce
  • 1 1/2 tablespoons black vinegar
  • 1 1/2 tablespoons sugar
  • small pinch of Chinese Five Spice powder, optional
  • 2 tablespoons water
  1. Marinade pork with Shaoxing wine, salt, egg and cornstarch for 30 minutes.
  2. In a separate bowl, mix the sauce ingredients. Set sauce mixture aside.
  3. Deep fry the pork slices until golden brown. Set aside.
  4. Bring sauce to a quick boil. Toss in the deep fried pork slices, stir and coat well with the sauce.
  5. Sprinkle with toasted sesame seeds.
Garlic and Chili Shrimps
  • 500 grams shrimps
  • 1 tablespoon olive oil
  • 1 tablespoon chopped garlic
  • 1 tablespoons chopped (seeded) chili
  • 2 tablespoons Shaoxing wine
  • 1 1/2 tablespoons soy sauce
  • Sugar and white pepper to taste
  1. Heat the oil. Add chopped garlic and chili. Stir-fry until fragrant.
  2. Add shrimps and stir well.
  3. Add Shaoxing wine, soy sauce, sugar and white pepper.
  4. Cook for another minute and turn off the heat. Serve.


Happy Chinese New Year to everyone who celebrates it :)! I think the opening theme of the film 'Once Upon a Time in China' suits the atmosphere of Chinese New Year well. Enjoy the music!


Wow, today's bento has got no rice in it...;)!! I have actually made a hamburger bento in the past when I just started bentoing, it was my 4th bento. I do like eating hamburger, but I have to admit that I am more a rice and noodle person than a bread/sandwich person, that's why most of my bento boxes usually always feature either something with rice or noodles.

One big advantage of this type of bento (burger/sandwich) is that it's quite simple to make - I at least think that it's easier than moulding rice with plastic wrap to create a cute character. So if you're a real beginner in the bento arena, you should start with this type of bento.

For the little bear hamburger, I used cheese, nori and deli meat to create the facial features. A decorating tip or a fat straw would come in handy to cut out the circles. I cut out the nori for the eyes manually, but if you have a nori punch, it would be a great help!

The puppy hamburger is decorated with cheese and nori for the eyes, nose and eyebrows and tomato for the tounge. The pink cheeks are made out of deli meat and the ears are cheddar cheese.

I made the hamburger patties with a recipe which I created myself out of the blue. They tasted great though, so don't be scared to give this recipe a shot...!

Hamburger Patties
- makes 8 -10 patties
  • 500 grams ground beef/pork
  • 1 egg
  • 1/2 onion, chopped
  • 2 tablespoons oyster sauce
  • 2 tablespoon soy sauce
  • 2 tablespoons flour
  • 5 tablespoons panko breadcrumbs
  • Pepper and sugar to taste

Mix all ingredients together. Divide into portions and make into patties. Pan-fry until each side of the patties is golden brown.


Bookmark and Share


I think my Rilakkumas look more worried than surprised...;)???


The last time I made Rilakkuma-themed bento was around half a year ago. Since Rilakkuma is pretty easy to make and it's quite cute too, whenever I am stuck on what to make or whenever I am too lazy to do something more complicated, Rilakkuma is a good choice I think :).


I cut out the white and dark yellow cheese Rilakkuma with my teddy bear cutter. As usual, the eyes, nose and mouth are made out of nori. The surprised cheese Rilakkuma are sitting on top of fried rice onigiri. The two Rilakkuma bears in the middle are made out of fried rice, each of them is holding a Rilakkuma food pick :).

I also had three homemade pan-fried kimchi mandu, cherry tomatoes, rucola, a few slices of cucumber, a few pieces of strawberries, grapes and mango cubes.


I have made some Rilakkuma-themed bento lunches in the past, if you are curious to see them, here they are:

Have a great weekend :)! I hope I can come up with another bento tomorrow, so stay tuned :)!


Bookmark and Share


I have never been a fan of Sesame Street, but since my little niece LOVES Elmo, I created this bento including a tutorial as well, so that my sister can recreate this super easy tomato-Elmo at home for her daughter.

A few days ago I received my packet from Bento USA. One of the things I got are these cute Alphabet & Number Cutters. These are perfect for bentos because these cutters are very small and suitable for cutting out ham and cheese for edible bento decorations. Starting from now on I can also write short messages in my bento box, how fun...:)!!


Since my bento-theme today is Elmo, I cut out 'ELMO' using the Alphabet cutters above. I also added some black toasted sesame seeds on top of the letters to make them look less plain.


The cherry tomato-Elmos are sitting on top of a bed of rice covered with nori. The musical notes are made out of blanched carrot and the leaves are cucumber skin. The right bento box contains chicken with spicy sesame sauce, Mum's 'instant' fried noodles, stir-fried string beans with ground pork (which unfortunately look too dark to be seen), blanched broccoli, blanched carrot flowers, one mini pepper, half a tomato and flower ham.

When I was a little girl I loved to eat instant noodles (well, I still do ;)) and my mother didn't like the idea at all and she always told me how bad and unhealthy instant noodles were. To persuade me to stop eating instant noodles, my mum created delicious homemade 'instant' fried noodles. Afterwards I always asked her to make me a small bowl of her instant noodles whenever I felt hungry before it's lunch or dinner time ;). Well, unfortunately during my university time, when I lived away from home, I returned to eating instant noodles again...;).

Chicken with Spicy Sesame Sauce
Adapted from 'Chinese Cuisine' by Su Huei Huang (Wei Chuan Cookbook)
  • 2 chicken breast fillets
  • 1 tablespoon oil
  • 1 tablespoon sesame paste (or peanut butter)
  • 1 tablespoon sugar
  • 1 tablespoon vinegar
  • 3 tablespoons soy sauce
  • 1 1/2 tablespoons chopped green onions
  • 1/2 teaspoon chopped ginger root
  • 1/2 teaspoon chopped garlic
  • 2 tablespoons chili oil
  1. Boil water in a large pot. Put chicken in the water. Cook for 15 minutes. Remove chicken and retain broth for other use. When the chicken is cool, cut into bite-size pieces. Arrange on a seving plate.
  2. Separately, heat oil in a wok. Add ginger and garlic and stir-fry until fragrant. Add the other ingredients (except the chicken). Mix well and cook for 1 minute.
  3. Pour the sauce on top of the chicken and serve.

Mum's 'Instant' Fried Noodles

  • 1 package fresh ramen noodles
  • 2 tablespoons 'Schweineschmalz' (or pork oil - which you can get by frying pork lard)
  • 2 tablespoons soy sauce
  • 2 tablespoons sweet soy sauce
  • Salt and white pepper to taste
  • Chopped green onions
  1. Heat the pork oil. Add ramen noodles and mix well with the pork oil.
  2. Add soy sauce, sweet soy sauce, salt and pepper. Cook for 30 seconds.
  3. Toss in the chopped green onions. Mix well and serve.


BENTO TUTORIAL

How to make Elmo with Cherry Tomatoes


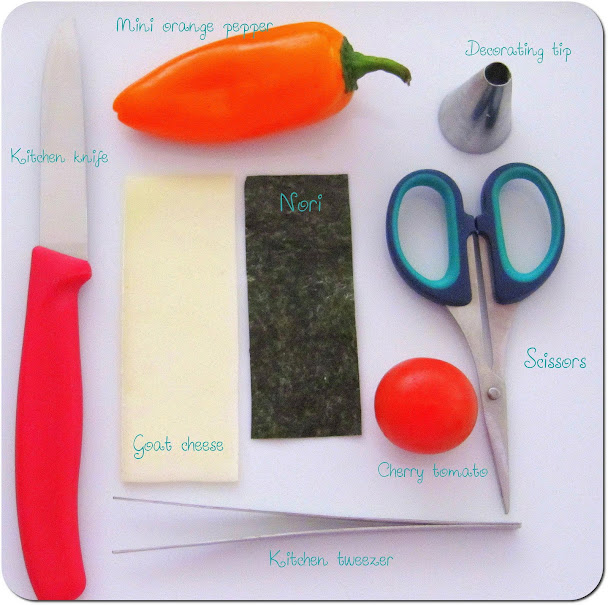
WHAT YOU NEED


NOTE - Small kitchen scissors will make your life easier when you have to cut out tiny shapes. Make sure that you use a kitchen tweezer - this means, please use it for food purposes only and don't double use it to pluck your eyebrows too, it's yucky...;)!!


  1. Cut out the mini pepper with a decorating tip to make the nose.
  2. With the same decorating tip, cut out the goat cheese to make the eyes.
  3. Assemble the eyes and nose on top of the cherry tomato with a kitchen tweezer.
  4. Fold the nori and cut out a round shape with kitchen scissors to make the black iris. Note: Folding the nori will make sure that you only have to cut out the eyes once and the size of both eyes will be the same.
  5. Cut a U shape out of the nori with kitchen scissors.
  6. Add the iris and mouth to make ELMO. Finito :)!


Bookmark and Share


I thought I'd blog more that I am on holiday, but I was wrong. Practically I've spent my days off doing nothing but watching war-related films/series...;). What a way to celebrate the festive season...;)!

Do you know 'Grave of the Fireflies'? I watched the live-action and totally cried my eyes out. I have the animation too but haven't watched it yet, I read that it's also extremely sad. I found a really good mini-series as well called '99 Years of Love: Japanese American'. The story is like a mixture of 'Gone with the wind' by Margareth Mitchell and 'The Good Earth' by Pearl.S.Buck.

Anyway, back to today's post... I finally managed to make a bento lunch again this morning after being absent from bento making for more than a week. At least I wanted to have something nice to celebrate the new year :).


The bento box consists of one puppy onigiri, three homemade ebi fries, pickled cucumber and carrot salad topped with rabbit-shaped papaya, two shrimp temari sushi, one egg, cheese daisy, strawberries and parsley for garnish.


Ebi Fry - makes 12
  • 12 large shrimps
  • 1 cup panko (Japanese bread crumbs)
  • 1/4 cup flour
  • 1 egg, beaten
  • 1 tablespoon oyster sauce
  • Salt and pepper to taste
Instructions
  • Set the eggs, flour and bread crumbs in three different shallow bowls.
  • Add oyster sauce, salt and pepper to the egg bowl and mix well.
  • One at a time, dredge the shrimp in the flour, then dip in the egg mixture and coat with the bread crumbs.
  • Repeat step 3 one more time (optional).
  • Deep-fry the shrimps until golden brown.

Pickled Cucumber and Carrot Salad

  • Cucumber - thinly sliced
  • Carrot - julienned
  • Salt
  • Sugar
  • Vinegar
  • Toasted sesame seeds for garnish

Directions

Cucumber pickles

  • Sprinkle the cucumber slices with salt. Set aside for 10 minutes.
  • Remove excess liquid from the cucumber and rinse with water. Pat dry.
  • Add vinegar and sugar to taste. Mix well.
  • Garnish with toasted sesame seeds.

Easy Carrot pickles

  • Mix the julienned carrot with vinegar, salt and sugar to taste.
  • Set aside for 10 minutes before serving.
  • Garnish with toasted sesame seeds.


I wish you all a very happy new year 2012 :D)!!
Bookmark and Share
Next PostNewer Posts Previous PostOlder Posts Home