Showing posts with label Tutorials. Show all posts

Hey everyone! For people who have previously visited my blog regularly, please don't get shocked ;)! I am sure you have noticed that I recently changed the look of my blog ;). I just wanted a change, because I simply couldn't see that same, old blog skin anymore, and I also wanted to personalise my blog a bit more. Previously I used a free blogskin available online somewhere, but this time, everything is designed by yours truly ;). So, please don't be too harsh on me, I know that there are lots of rooms for improvement, especially because I don't have any knowledge in coding. I was thinking to use a different platform other than blogger, because it's going to give me more freedom in designing my blog. But then again, I've been using blogger for (wow!) a bit more than 4 years now, so I decided to stay here and be loyal to blogger ;). 

I will nevertheless add a new section to my blog, such as a gallery to improve audience experience - I am aware that my blog is not the easiest to navigate. If you think that there are other cool things I should add to my blog, please do let me know :). 

Anyway, back to the bento above - I actually made it ages ago, but haven't posted about it until today. It's pretty simple to make and you don't need god-mighty skills to make it as long as you own some cookie cutters and a nori punch. The kitties are made from fried spam, cheese, carrot and nori seaweed. The sides are a portion of boiled corn kernels, edamame beans and pan-fried scotch egg.


I will make a horse-themed bento within the next few days since it's my dad's year as well :). My dad is currently here, so it's going to be dedicated to him :). Stay tuned!

Bookmark and Share


I got the idea to make these cheese panda stamps out of the blue. I was looking at my collection of bento cutters, then I noticed that if I combined my bear cutter and bunny cutter together, I would be able to make a standing bear/panda. Do look at the tutorial below, it's pretty simple. Click the picture to make it bigger, in case that you can't read the instructions.

TUTORIAL


The panda stamps are lying on top of rice which I steamed with chopped carrots and dashi stock. The other box contains two fried panko shrimps, tamagoyaki filled with green onions and imitation crab, salad, mac n cheese and a few pieces of strawberries.


Bookmark and Share


I have never been a fan of Sesame Street, but since my little niece LOVES Elmo, I created this bento including a tutorial as well, so that my sister can recreate this super easy tomato-Elmo at home for her daughter.

A few days ago I received my packet from Bento USA. One of the things I got are these cute Alphabet & Number Cutters. These are perfect for bentos because these cutters are very small and suitable for cutting out ham and cheese for edible bento decorations. Starting from now on I can also write short messages in my bento box, how fun...:)!!


Since my bento-theme today is Elmo, I cut out 'ELMO' using the Alphabet cutters above. I also added some black toasted sesame seeds on top of the letters to make them look less plain.


The cherry tomato-Elmos are sitting on top of a bed of rice covered with nori. The musical notes are made out of blanched carrot and the leaves are cucumber skin. The right bento box contains chicken with spicy sesame sauce, Mum's 'instant' fried noodles, stir-fried string beans with ground pork (which unfortunately look too dark to be seen), blanched broccoli, blanched carrot flowers, one mini pepper, half a tomato and flower ham.

When I was a little girl I loved to eat instant noodles (well, I still do ;)) and my mother didn't like the idea at all and she always told me how bad and unhealthy instant noodles were. To persuade me to stop eating instant noodles, my mum created delicious homemade 'instant' fried noodles. Afterwards I always asked her to make me a small bowl of her instant noodles whenever I felt hungry before it's lunch or dinner time ;). Well, unfortunately during my university time, when I lived away from home, I returned to eating instant noodles again...;).

Chicken with Spicy Sesame Sauce
Adapted from 'Chinese Cuisine' by Su Huei Huang (Wei Chuan Cookbook)
  • 2 chicken breast fillets
  • 1 tablespoon oil
  • 1 tablespoon sesame paste (or peanut butter)
  • 1 tablespoon sugar
  • 1 tablespoon vinegar
  • 3 tablespoons soy sauce
  • 1 1/2 tablespoons chopped green onions
  • 1/2 teaspoon chopped ginger root
  • 1/2 teaspoon chopped garlic
  • 2 tablespoons chili oil
  1. Boil water in a large pot. Put chicken in the water. Cook for 15 minutes. Remove chicken and retain broth for other use. When the chicken is cool, cut into bite-size pieces. Arrange on a seving plate.
  2. Separately, heat oil in a wok. Add ginger and garlic and stir-fry until fragrant. Add the other ingredients (except the chicken). Mix well and cook for 1 minute.
  3. Pour the sauce on top of the chicken and serve.

Mum's 'Instant' Fried Noodles

  • 1 package fresh ramen noodles
  • 2 tablespoons 'Schweineschmalz' (or pork oil - which you can get by frying pork lard)
  • 2 tablespoons soy sauce
  • 2 tablespoons sweet soy sauce
  • Salt and white pepper to taste
  • Chopped green onions
  1. Heat the pork oil. Add ramen noodles and mix well with the pork oil.
  2. Add soy sauce, sweet soy sauce, salt and pepper. Cook for 30 seconds.
  3. Toss in the chopped green onions. Mix well and serve.


BENTO TUTORIAL

How to make Elmo with Cherry Tomatoes


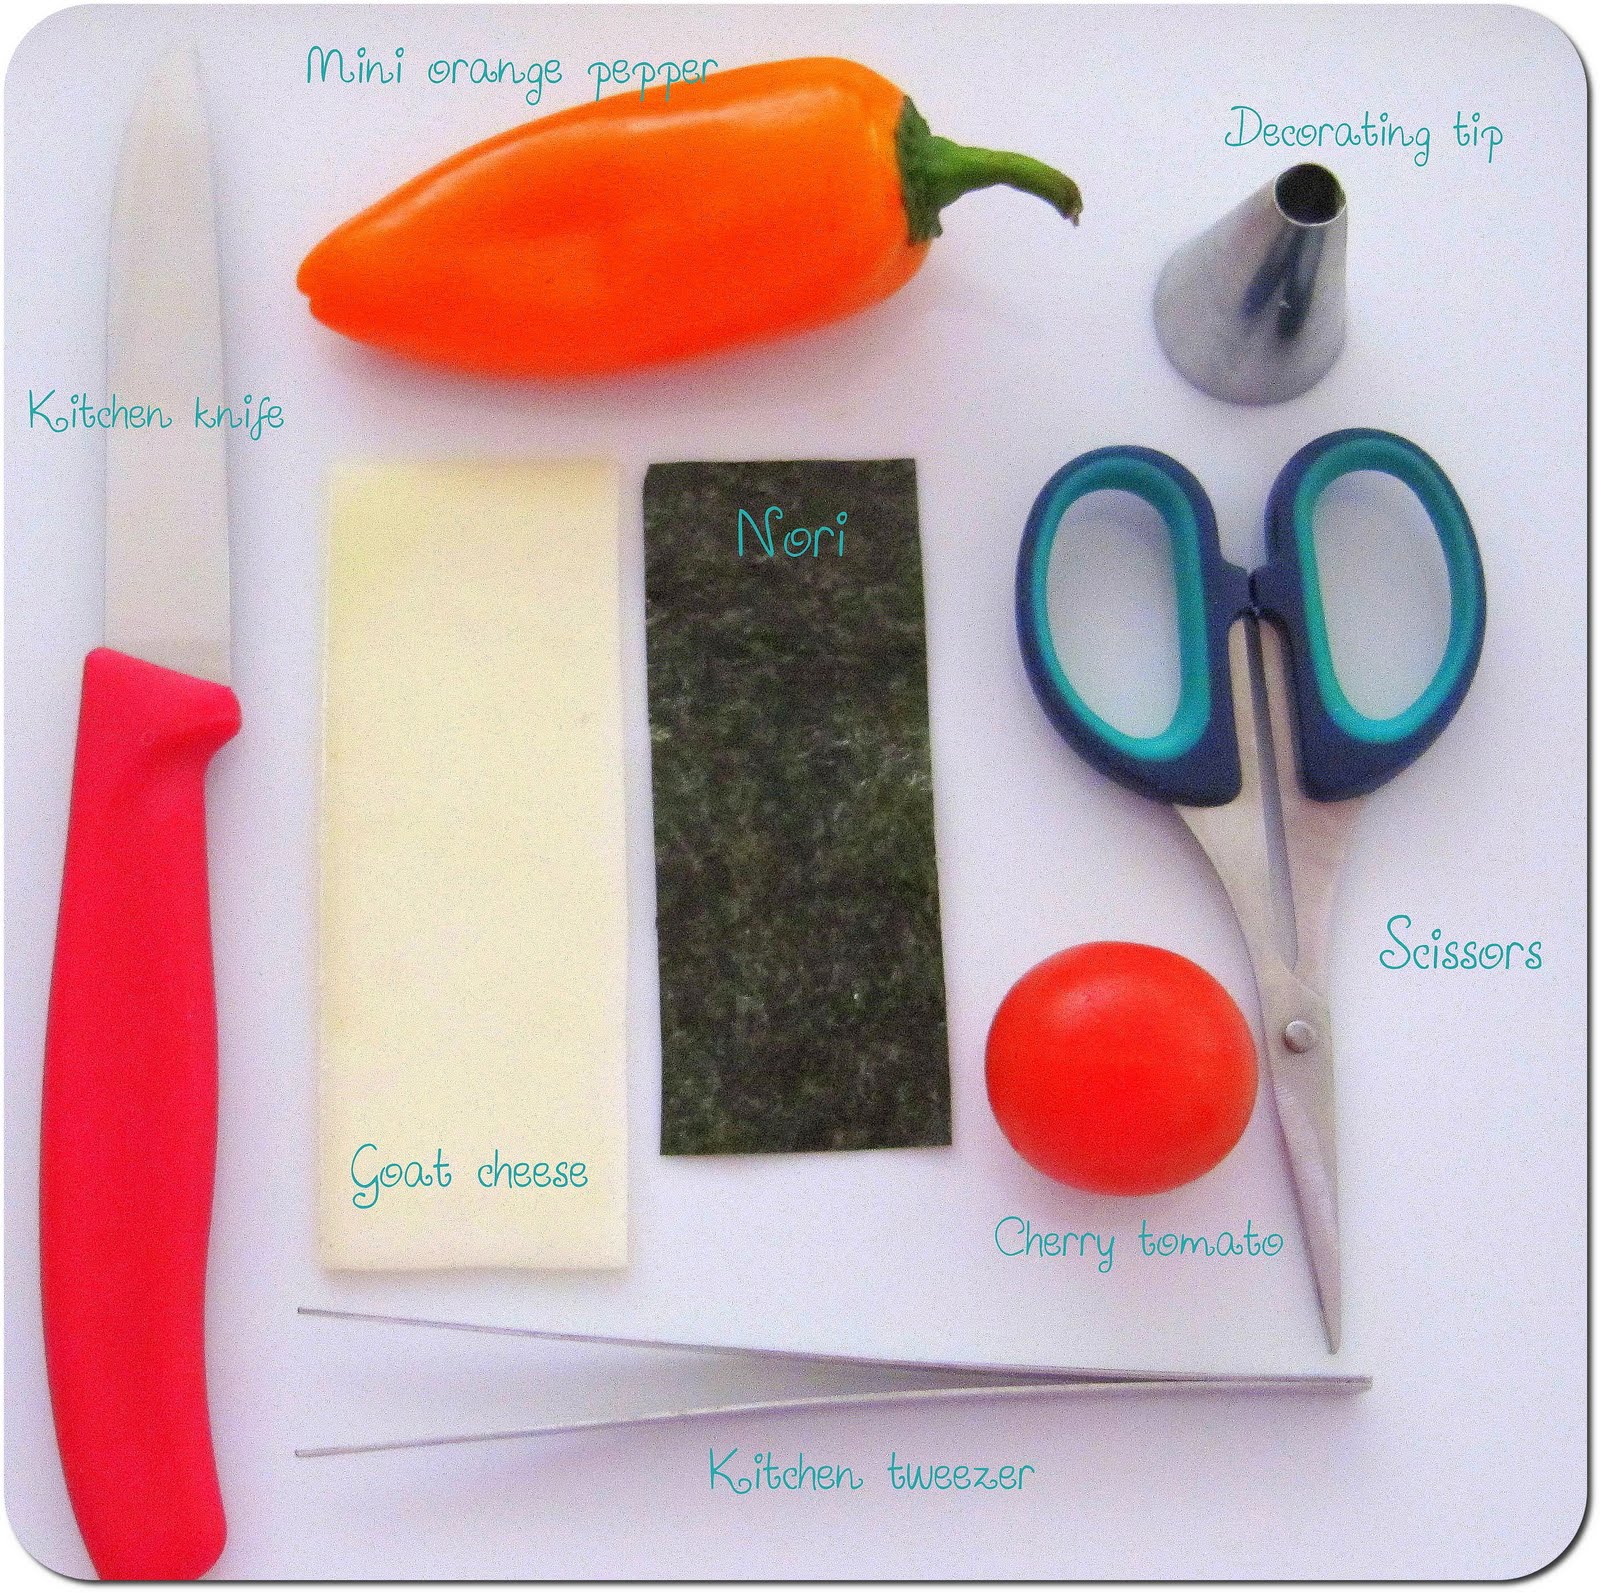
WHAT YOU NEED


NOTE - Small kitchen scissors will make your life easier when you have to cut out tiny shapes. Make sure that you use a kitchen tweezer - this means, please use it for food purposes only and don't double use it to pluck your eyebrows too, it's yucky...;)!!


  1. Cut out the mini pepper with a decorating tip to make the nose.
  2. With the same decorating tip, cut out the goat cheese to make the eyes.
  3. Assemble the eyes and nose on top of the cherry tomato with a kitchen tweezer.
  4. Fold the nori and cut out a round shape with kitchen scissors to make the black iris. Note: Folding the nori will make sure that you only have to cut out the eyes once and the size of both eyes will be the same.
  5. Cut a U shape out of the nori with kitchen scissors.
  6. Add the iris and mouth to make ELMO. Finito :)!


Bookmark and Share


Have you ever heard of Cheburashka? I had not, until one reader from France, Elo', commented under my Dragon Rilakkuma bento: "Do you know "tcheburacha" (Чебурашка)? It's the phonetic name of a famous Russian character, he's really loved by children, I thought it could be an inspiration for a charaben, with his big ears and his sad face." I googled the character and found some pictures from the net, including the background story from Wikipedia.

Cheburashka is a funny little creature, unknown to science, who lives in the tropical forest. He accidentally gets into a crate of oranges, eats his fill, and falls asleep. The crate is eventually delivered to a grocery store in an unnamed town where the rest of the main story unfolds. Cheburashka is a name given to the character by the puzzled store manager who finds the creature in the crate when he opens it. The salesman takes the animal out and sits him on the table, but his paws are numb after the long time spent in the crate, and he tumbles down ("cheburakhnulsya" (чебурахнулся), a Russian colloquialism, "tumbled" in English) from the table onto the chair and then from the chair, where he could not sit, for the same reason, onto the floor. The store manager, who witnesses the scene, called him Cheburashka. (Source: Wikipedia)

I thought he looked quite adorable and not too complicated to make, so I'd promised Elo' to make the Cheburashka bento in the near future - I know it's been quite some time now, but I hope you like this Cheburashka bento, Elo' :)!

In the beginning I wanted to make him from meat patties, but today I just didn't feel like eating meat patties, so I decided to make the character from rice mixed with spicy pork soboro (Soboro simply means seasoned finely chopped meat, egg, fish or vegetables, etc, usually used as toppings for steamed rice) and the facial features from cheese and nori.

Spicy Pork Soboro
  • 250 grams ground pork
  • 1 tablespoon oil
  • 1 tablespoon sake (or cooking wine)
  • 2 tablespoons hot bean paste
  • 1 tablespoon Szechuan chili paste
  • 1/2 tablespoon soy sauce
  • A pinch of sugar
Instructions
  • Heat your skillet and add 1 tablespoon cooking oil.
  • Toss in the ground pork and cook until the meat is slightly brown.
  • Add sake, hot bean paste, Szechuan chili paste, soy sauce and sugar.
  • Stir-fry the meat for a few minutes until it's completely cooked.

TUTORIAL


Now I want to show you how to make deli-meat flower, because a few people have been asking me to show the step-by-step pictures. The pictures below are rather small, but I hope you can still recognise them. Making deli-meat flower is actually very easy and there are several methods to make it, but the one below is the method which I like to use because I think the flower holds together better.


With a slice of deli-meat you can make 2 flowers.
  1. You need: a slice of deli meat and a kitchen knife.
  2. Cut the deli meat in half.
  3. Cut lines in the middle of the deli-meat, but not all the way.
  4. Fold the deli meat in half.
  5. Roll it up!
  6. Keep rolling!
  7. And voilà - you get one deli meat flower :).


My bento box today is filled with: Cheburashaka-shaped onigri (rice mixed with spicy pork soboro), chopped omelet, two pieces of broccoli, two pieces of cheese flowers, two deli-meat flowers, one piece of radish, rucola and four mini cheese flowers.

BENTO GIVEAWAY ANNOUNCEMENT

I'd also like to use the chance now to announce the two lucky winners of my bento giveaway: Mieke (first winner) from the Netherlands and Lyn Trinix from Singapore (second winner) :D)! I wish everyone who has participated could get something, unfortunately, it's quite impossible...:(. Maybe, one day when I was a millionaire ;)!! All in all there were 75 people who participated including several people who contacted me through e-mail. So, thank you so much, everyone, for joining in this event :). I hope the people who don't win this time wouldn't get too upset, there will still be other giveaways or contests being held here in the future. So stay tuned :)!

Winners, you'll be contacted shortly, you'll have to provide me with your address so that CasaBento can send you the prize :).

Bookmark and Share

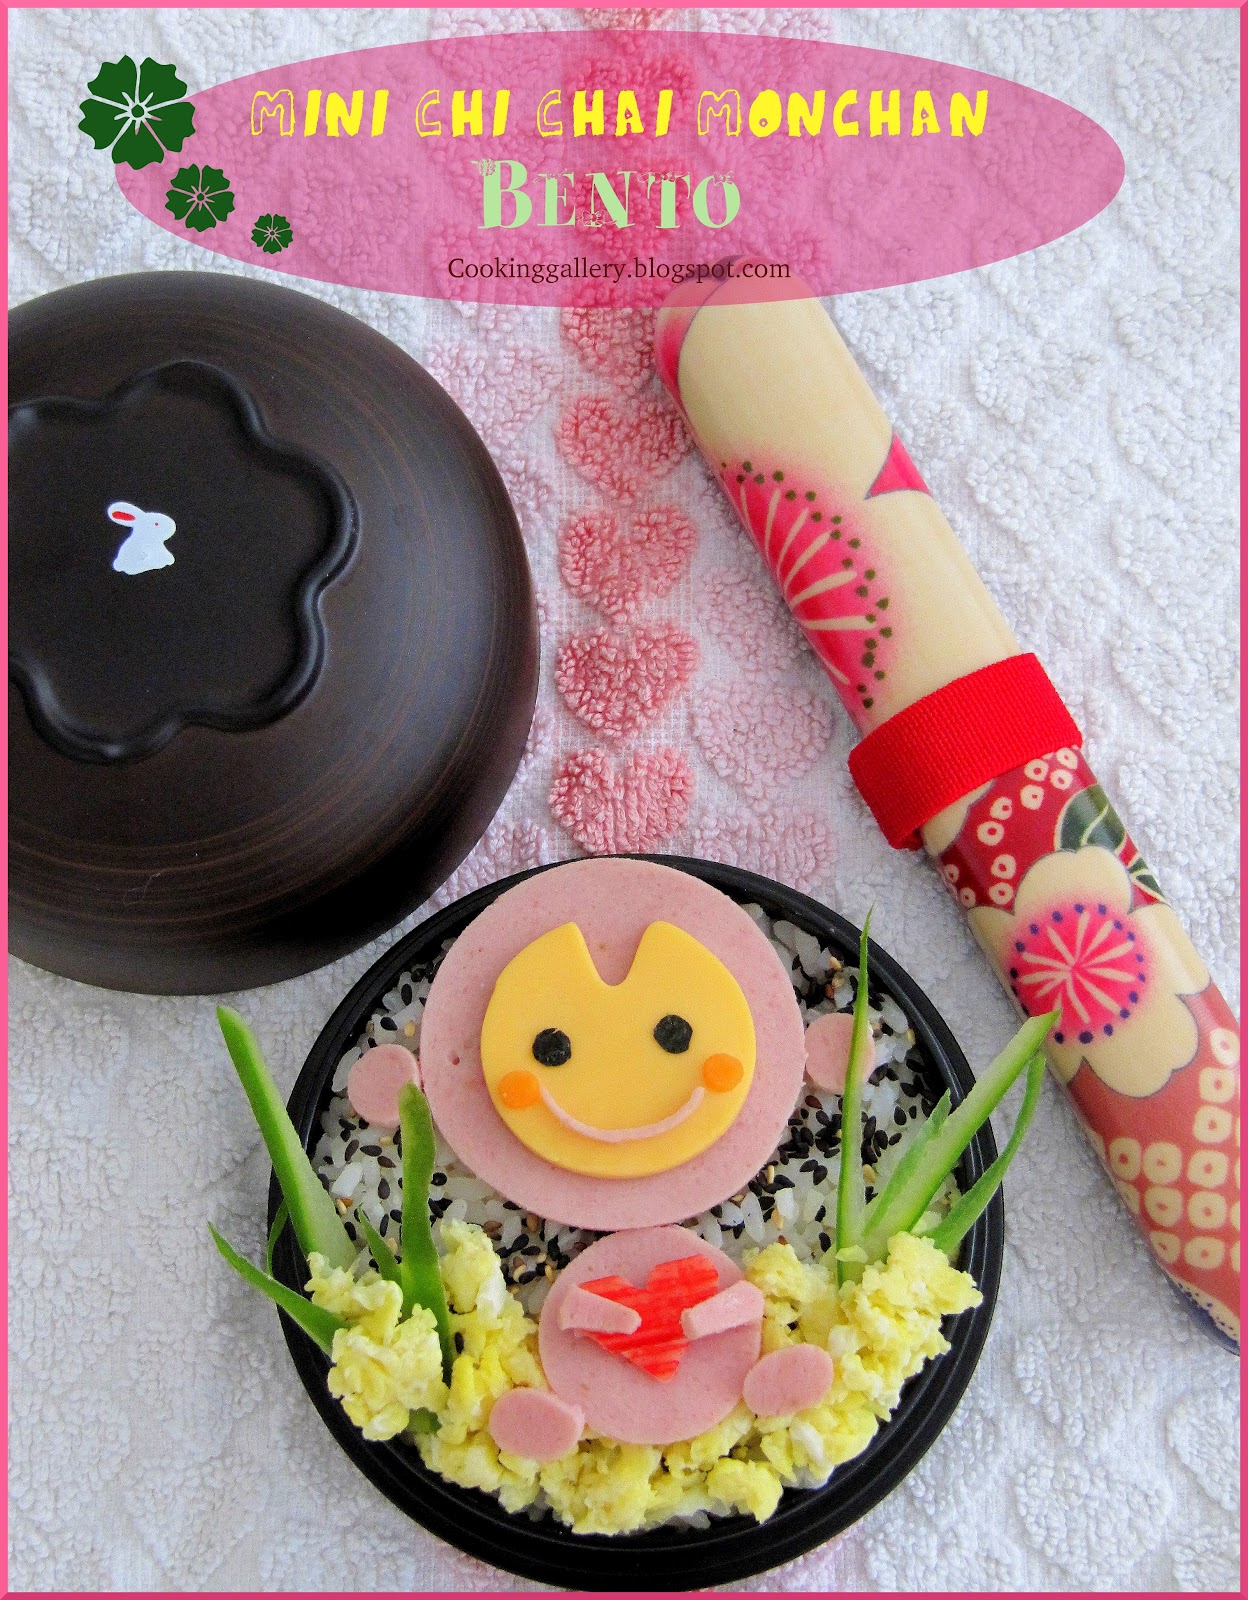
Another very simple bento :). I just made this bento half an hour ago and I mainly made it for fun. Chi Chai Monchan is another cute character from Sanrio. I browsed the Sanrio homepage and thought that this character seemed to be quite easy to make. Making him only took me 10 minutes, because again, I simply used some cookie cutters to help me make this character. I didn't take the step-by-step pictures, but I will do so later in the day after I do some grocery shopping. I don't have deli-meat available anymore...!


The bento is filled with rice, toasted sesame seeds, scrambled eggs, cucumber sticks and Chi Chai Monchan (deli meat, cheddar cheese, carrot and surimi). I will update this post today and include some step-by-step picture. So stay tune...:)!

UPDATE

As promised, here are the step-by-step pictures. This time I use white coloured cheese for the face. Decide yourself which colour you like better, white or orange.

What you need:
  • A slice of pink deli meat
  • A slice of cheese (white/orange)
  • A piece of nori paper
  • A slice of carrot
  • 3 different-size round cookie cutters
  • A think drinking straw
  • A fat drinking straw
  • A kitchen knide
  • A kitchen tweezers


  1. Use the biggest round cookie cutter to make Monchan's face.
  2. Use the second biggest round cookie cutter to make the inner part of Monchan's face.
  3. With a kitchen knife, cut out a triangle from the cheese-face.
  4. Make Monchan's body using the smallest cookie cutter.
  5. Make 4 mini circles with a fat drinking straw (2 for the ears and 2 for the feet).
  6. Pinch a fat straw so that the end is oval.Punch 2 ovals out of the deli meat - these ovals are the hands.
  7. Punch a circle out of the remaining deli meat with the smallest cookie cutter. Then with the same cookie cutter, cut out the top/bottom bit of the round deli meat to make a smile shape.
  8. Punch 2 circles out of the carrot slice with the thin straw - these are for the rosy (well, orangy) cheeks.
NOTE: One last thing, you still need to cut 2 circles out of nori for the eyes. If you have a nori punch, you can use this too. The tail is optional.

UPDATE: 19/7/2013
Video Tutorial 


Bookmark and Share


A speedy bento today. I have got quite some responses to my question yesterday about which character to make for my next bento. First of all, thank you for taking the time to write down some ideas for me. Highly appreciated...:)! Truth be told, I finally got confused...! Too much input is after all probably not that good for my disorganised brain ;). Somebody said 'Hello Kitty', I almost made this character because it's easy, but I am not a fan of Hello Kitty, that's why I finally didn't do so. I thought about making a koala or a panda too, but in the end lost interest because both were too complicated to make - maybe one day when I am more skillful in bento making....!

Eventually I made something very simple : Two bears in bunny suits, only with the help of a bunny sandwich cutter and a round cookie cutter. I've included the step-by-step pictures below if you're interested to make the bears. I hope the pictures are enough to show you how to make the bears. At the moment I am not in the mood of writing much because it's already very late here and I don't intend to stay up much longer.


What you need:
  • Bunny sandwich cutter
  • a round cookie cutter
  • Nori punch (for quail eggs)
  • a piece of Nori paper
  • Chili sauce
  • Toothpick
  • a slice of (white) cheese
  • a slice of pink deli meat
  • a fat drinking straw (Apologies, not in the photo...!) - to make the nose, ears and hands.
UPDATE (29/01/2012)
Here are the step-by-step instructions:
  1. Cut out the deli meat with the bunny cutter to make a bunny shape.
  2. Cut out the cheese with the bunny cutter to make another bunny shape.
  3. Remove the bottom half of the deli-meat bunny with a round cookie cutter to make a bunny suit
  4. Add the deli meat bunny suit on top of the bunny cheese.
  5. Add the nose (you can make the nose by cutting out cheese with a drinking straw).
  6. Add the facial features (punch the eyes, nose and mouth with a nori puncher). Use a toothpick to dab the chili sauce on the cheeks. The hands and white parts of the ears are made out of cheese - these are also cut out with a drinking straw.


To be honest, I am not very happy with the bears. They look as if they're wearing a bunny hair band instead of a bunny suit... But anyway, the bento was at least quite tasty. It's rice with chicken teriyaki :).


Bookmark and Share

I received my new wooden bento box which I ordered online from CasaBento a few days ago. It looks gorgeous and traditionally elegant...! The only drawback is that it is not dishwasher-safe. But truth be told, I don't really mind that it's not dishwasher-safe. It only takes less than one minute to wash it by hands...


Since I love this new bento box so much, of course I need to make a bento meal just for the sake of using this new box ;). I had some leftover yellow-tinted quail eggs from two days ago (I thought about using them for the Easter Parade Bento, but the basket got too full before I could do anything with the quail eggs), and somehow Winnie the Pooh came to mind, even though I am not a fan of this character. I do like the classic Winnie the Pooh illustrated by E.H. Shepard though.

If you own a nori punch for making characters with quail eggs, making my version of Winnie the Pooh would be quite effortless. I have got quite some requests from my blog readers that I should include a tutorial to my bento posts, so today I will attempt to show you how to make the pooh bear in the tutorial below. Apologies in advance if it's not that clear. I still need to get used to doing a tutorial...!

TUTORIAL

HOW TO MAKE BABY POOH BEAR USING QUAIL EGGS


What You Need


You can colour the hard-boild quail eggs by soaking them in yellow-tinted water. Dilute turmeric / curry powder in warm water and soak the eggs until they turn yellow. You can make the eggs rounder by slightly pinching them with your fingers.

STEP 1 - The Happy Faces


Use a nori punch to make eyes, nose and mouth out of nori paper.

STEP 2 - The EARS


Use a fat drinking straw to cut an oval (by slightly pinching the straw) out of the cheese for the Pooh Bear's ears. Cut the oval in half.


Use a knife to make a slit at the top of the quail egg. With tweezers tuck the cheese ears into the slit.


STEP 3 - The Nose


Use the same straw to cut a circle out of cheese to make the nose.


Use the straw to cut out the edges of the cheese-circle to make a small oval nose.


STEP 4 - The FUN Part: Applying Facial Features

Attach the nori eyebrows, nori eyes, nori/cheese nose and nori mouth to the egg. I didn't use anything to stick these facial features to the egg, but in case they didn't stick well, use a dab of mayonnaise as 'glue'.


Please welcome The Egg Pops...:D)


Yellow Pooh Bear
Dab on rosy ketchup/chili sauce cheeks with a toothpick.


White Pooh Bear
In case you don't want to tint your quail eggs.


The Pooh Bears Trio


Bento Box 1: Rice topped with toasted black sesame seeds, ham flowers and cucumber leaves, 2 pieces of edamame, Baby Pooh eggs, lettuce, 2 slices of tomato, a piece of broccoli and a piece of strawberry.

Bento Box 2: Easy Mapo Tofu, a few slices of cucumber, tomato and carrot, 2 rolls of ham, half a quail egg and a few pieces of edamame.


Easy Mapo Tofu
  • 100 grams tofu, cut into little cubes
  • 100 grams minced pork
  • 1 tablespoon cooking oil
  • 2 tablespoons fish sauce
  • 2 - 3 tablepoons hot bean sauce
  • 2 - 3 tablespoons Szechuan chili oil with fried pork (see picture below)
  • A pinch of sugar


My secret ingredient for beautiful Szechuan dishes...:D)!

Stir-fry all ingredients until cooked. That's it. Super simple. And super tasty! I used to make the elaborate version of Mapo Tofu, which was also very good, but this speedy version really can compete with the original!


Bookmark and Share


It's almost Easter, so I decided to make something Easter-related : an Easter bunny :)! Well, at least my version of an Easter bunny - a rabbit with a pink bunny costume ;). I love rabbits anyway, so making this bento was a lot of fun. My long time readers should know that I even have four rabbits which I love to death :D).

If you want to try to recreate this bunny at home, scroll down and look at the (short) tutorial below. Please excuse the blurry pictures...!

Blushing Bunny Onigiri
  • Cooked white rice
  • Cooked pink rice (you can use Sakura denbu, beet juice or a drop of red food colouring to colour your rice.)
  • White-coloured cheese for the nose and to accentuate the eyes
  • Nori (roasted seaweed) for eyes, nose and lips
  • Plastic wrap to shape the rice


Form the pink rice into a half-moon shape. This will be used to cover the bunny's head.


Make two long ovals for the ears.


Using the white rice, make a round ball, then cover it with the pink half-moon shaped onigiri.

Afterwards you only need to attach the ears and then add the eyes, nose and lips. I blushed her cheeks with pink edible dusting powder.


Filling: Blushing bunny onigiri, fried shrimps (ebi furai), cheese chicken nuggets, a piece of broccoli decorated with cheese and red currant, green beans/smoked ham rolls, tamagoyaki, Tonkatsu sauce and mayonnaise (in the blue and pink polka-dot containers), 2 slices of orange, 2 pieces of strawberries, a few pieces of sugar snap peas, a flower ham and 2 pieces of faur watermelon (from cucumber, surimi and black sesame seeds).

I will make some more Easter-themed bentos or sweet goodies in the next few days, so stay tuned :)!

Bookmark and Share


Does it look like a monkey? My husband couldn't guess that it's a monkey :(.

This bento was rather quick to make, I suppose it's because I didn't try to make too much food like previously. I know I somehow always made 'picnic bento' in the past ;). I took some pictures of the monkey before it was formed, and I hope this would help people who want to recreate this character at home. You don't need fancy bento accessories at all, here are what I used:

  • Brown rice (or white rice browned with soy sauce)
  • Cheese, I used Gouda
  • Roasted seaweed (nori)
  • Ham
  • Toothpick
  • Decorating tip
  • Drinking straw
  • Plastic wrap
  • Kitchen knife
  • Kitchen scissors
  • Your hands :)


I used a toothpick to outline the face of the monkey, before cutting it out with a kitchen knife. Use the bottom part of the decorating tip to make two small circles from the cheese and nori. These would later be used for the eyes (You don't actually need to make two cheese circles, the nori circles are enough for the eyes, I just wanted the eyes to pop out more). The nose holes are made out of nori. I cut these out manually, the same with the mouth. I used the drinking straw to cut out the mini pink cheeks.


Then I formed the rice using plastic wrap, before topping it up with the 'face accessories'. Don't forget to make two smaller rice balls for the ears - not pictured here, unfortunately... I was in a hurry!

I you look at the finished monkey rice balls one more time, you'll notice that in the end I decided to add more 'face accessories'. I added mini cheese circles to the eyes to brighten them up (I used my drinking straw to cut them out) and two bigger pink cheeks which I cut out using my decorating tip. The inner pink parts of the ears are cut out using the bottom part of the decorating tip again.


Filling: slices of mandarin, hard-boiled egg, cherry tomatoes, blackberries, broccoli, grapes, edamame (boiled soy beans), green beans/ham rolls, German 'Frikadelle'/meat patties, monkey rice balls, potato salad, green tea mochi and two chocolate truffles.


Bookmark and Share
Previous PostOlder Posts Home